# Setup Virtual/Online Session Notifications

{% hint style="warning" %}
**Important Note:**

* If you are scheduling multiple appointments in bulk, clients will receive notifications for each appointment individually by default.
* To prevent multiple notifications from being sent, use the **Bulk Appointment Trigger Automation** to send a single, consolidated summary notification instead. This ensures clear and efficient communication with your clients.

For more details, refer to the setup guide here: [**Bulk Appointment Notification Setup.**](https://help.whautomate.com/product-guides/appointments/setup-bulk-appointment-notifications)
{% endhint %}

Step 1: Go to the **Whautomate** app then click the **Automation** menu and select the **Add Rule** button as shown in the below picture 👇

<figure><img src="/files/ntpyy3d9d8vRvumyuXjp" alt=""><figcaption></figcaption></figure>

Step 2: Select the **Create Rules from Scratch** option to continue

<figure><img src="/files/jQFgolel78m4olHHoL9P" alt=""><figcaption></figcaption></figure>

Step 3: Choose the **Appointment Updates** as a **Trigger**&#x20;

<figure><img src="/files/ekHyh0ezdYZBw65QQZYD" alt=""><figcaption></figcaption></figure>

Step 4: To add conditions, simply click on the "**Add Condition**" button

<figure><img src="/files/KohaMZ2F4LX8YkzyVvaM" alt=""><figcaption></figcaption></figure>

Step 5: Choose the condition **Field** option like **"Appointment Type" 👇**

<figure><img src="/files/nja4EFXV6CgrmCeB4Z5G" alt=""><figcaption></figcaption></figure>

Step 6: Choose the condition **Operator** option like **"equals" 👇**

<figure><img src="/files/OzOx8LL2bNuEcWqCU8qy" alt=""><figcaption></figcaption></figure>

Step 7: Choose the condition **Type** option like **"Virtual/Online Session" 👇**

This condition-type option is when a client or you book an appointment for a client. If the appointment type is marked as **"Virtual/Online Session"**. The client will receive a notification via WhatsApp and Email.

<mark style="background-color:yellow;">**Note**</mark><mark style="background-color:yellow;">: Similarly, the condition type option is when a client or you booked an appointment type such as Location Visit or Home Visit, the status will be marked as</mark> <mark style="background-color:yellow;"></mark><mark style="background-color:yellow;">**Location Visit**</mark> <mark style="background-color:yellow;"></mark><mark style="background-color:yellow;">or</mark> <mark style="background-color:yellow;"></mark><mark style="background-color:yellow;">**Home Visit**</mark><mark style="background-color:yellow;">. The client will receive a notification via WhatsApp and Email.</mark>&#x20;

<figure><img src="/files/OUIszJDKZRHppq6ne8cn" alt=""><figcaption></figcaption></figure>

{% hint style="warning" %}
**Important Note:**

If you have already set up the **Bulk Appointment Notification**, you need to configure an additional condition to manage notifications effectively and avoid sending multiple notifications.

**Set Up a Participant Frequency Condition**

* **Condition Field**: Select **"Appointment Frequency"**.
* **Condition Type**: Choose one of the following:
  * **Individual**: To prevent notifications from being sent for bulk appointment scheduling.
  * **Bulk/Repeat**: To allow notifications to be sent for each appointment when scheduling multiple appointments in bulk.

***

**Example Usage**

* **Bulk Appointments**: If you are scheduling multiple appointments in bulk and want to send notifications for **each appointment**, set the condition type to **"Bulk/Repeat"**.
* **Avoid Multiple Notifications**: If you want to prevent multiple notifications when scheduling bulk appointments, set the condition type to **"Individual"**.
* **Single Appointment**: For individual appointment scheduling, ensure the condition type is set to **"Individual"** so the notification is sent. 👇
  {% endhint %}

<figure><img src="/files/JoBF0pDjTLnLqlVQhdAo" alt=""><figcaption></figcaption></figure>

Step 8: Select an **Action** you want to notify your client of their appointment booked such as **WhatsApp** and **Email notification.**&#x20;

For WhatsApp Eg. Select a **Send a WhatsApp template message** and fill in the required details. 👇

<figure><img src="/files/7Lsqgw3rznthHDdC7zP2" alt=""><figcaption></figcaption></figure>

Step 9: Select a WhatsApp template message you want to notify your client for their appointment booked confirmation.

(i) Select the **Add Wait & Schedule Time** button so you can set up a notification wait time and Schedule a specific time to send a notification

Eg. This notification will be sent 1 Day before the appointment and at 09:00 AM 👇

<figure><img src="/files/J32v5CYIkRBQprNUDnzO" alt=""><figcaption></figcaption></figure>

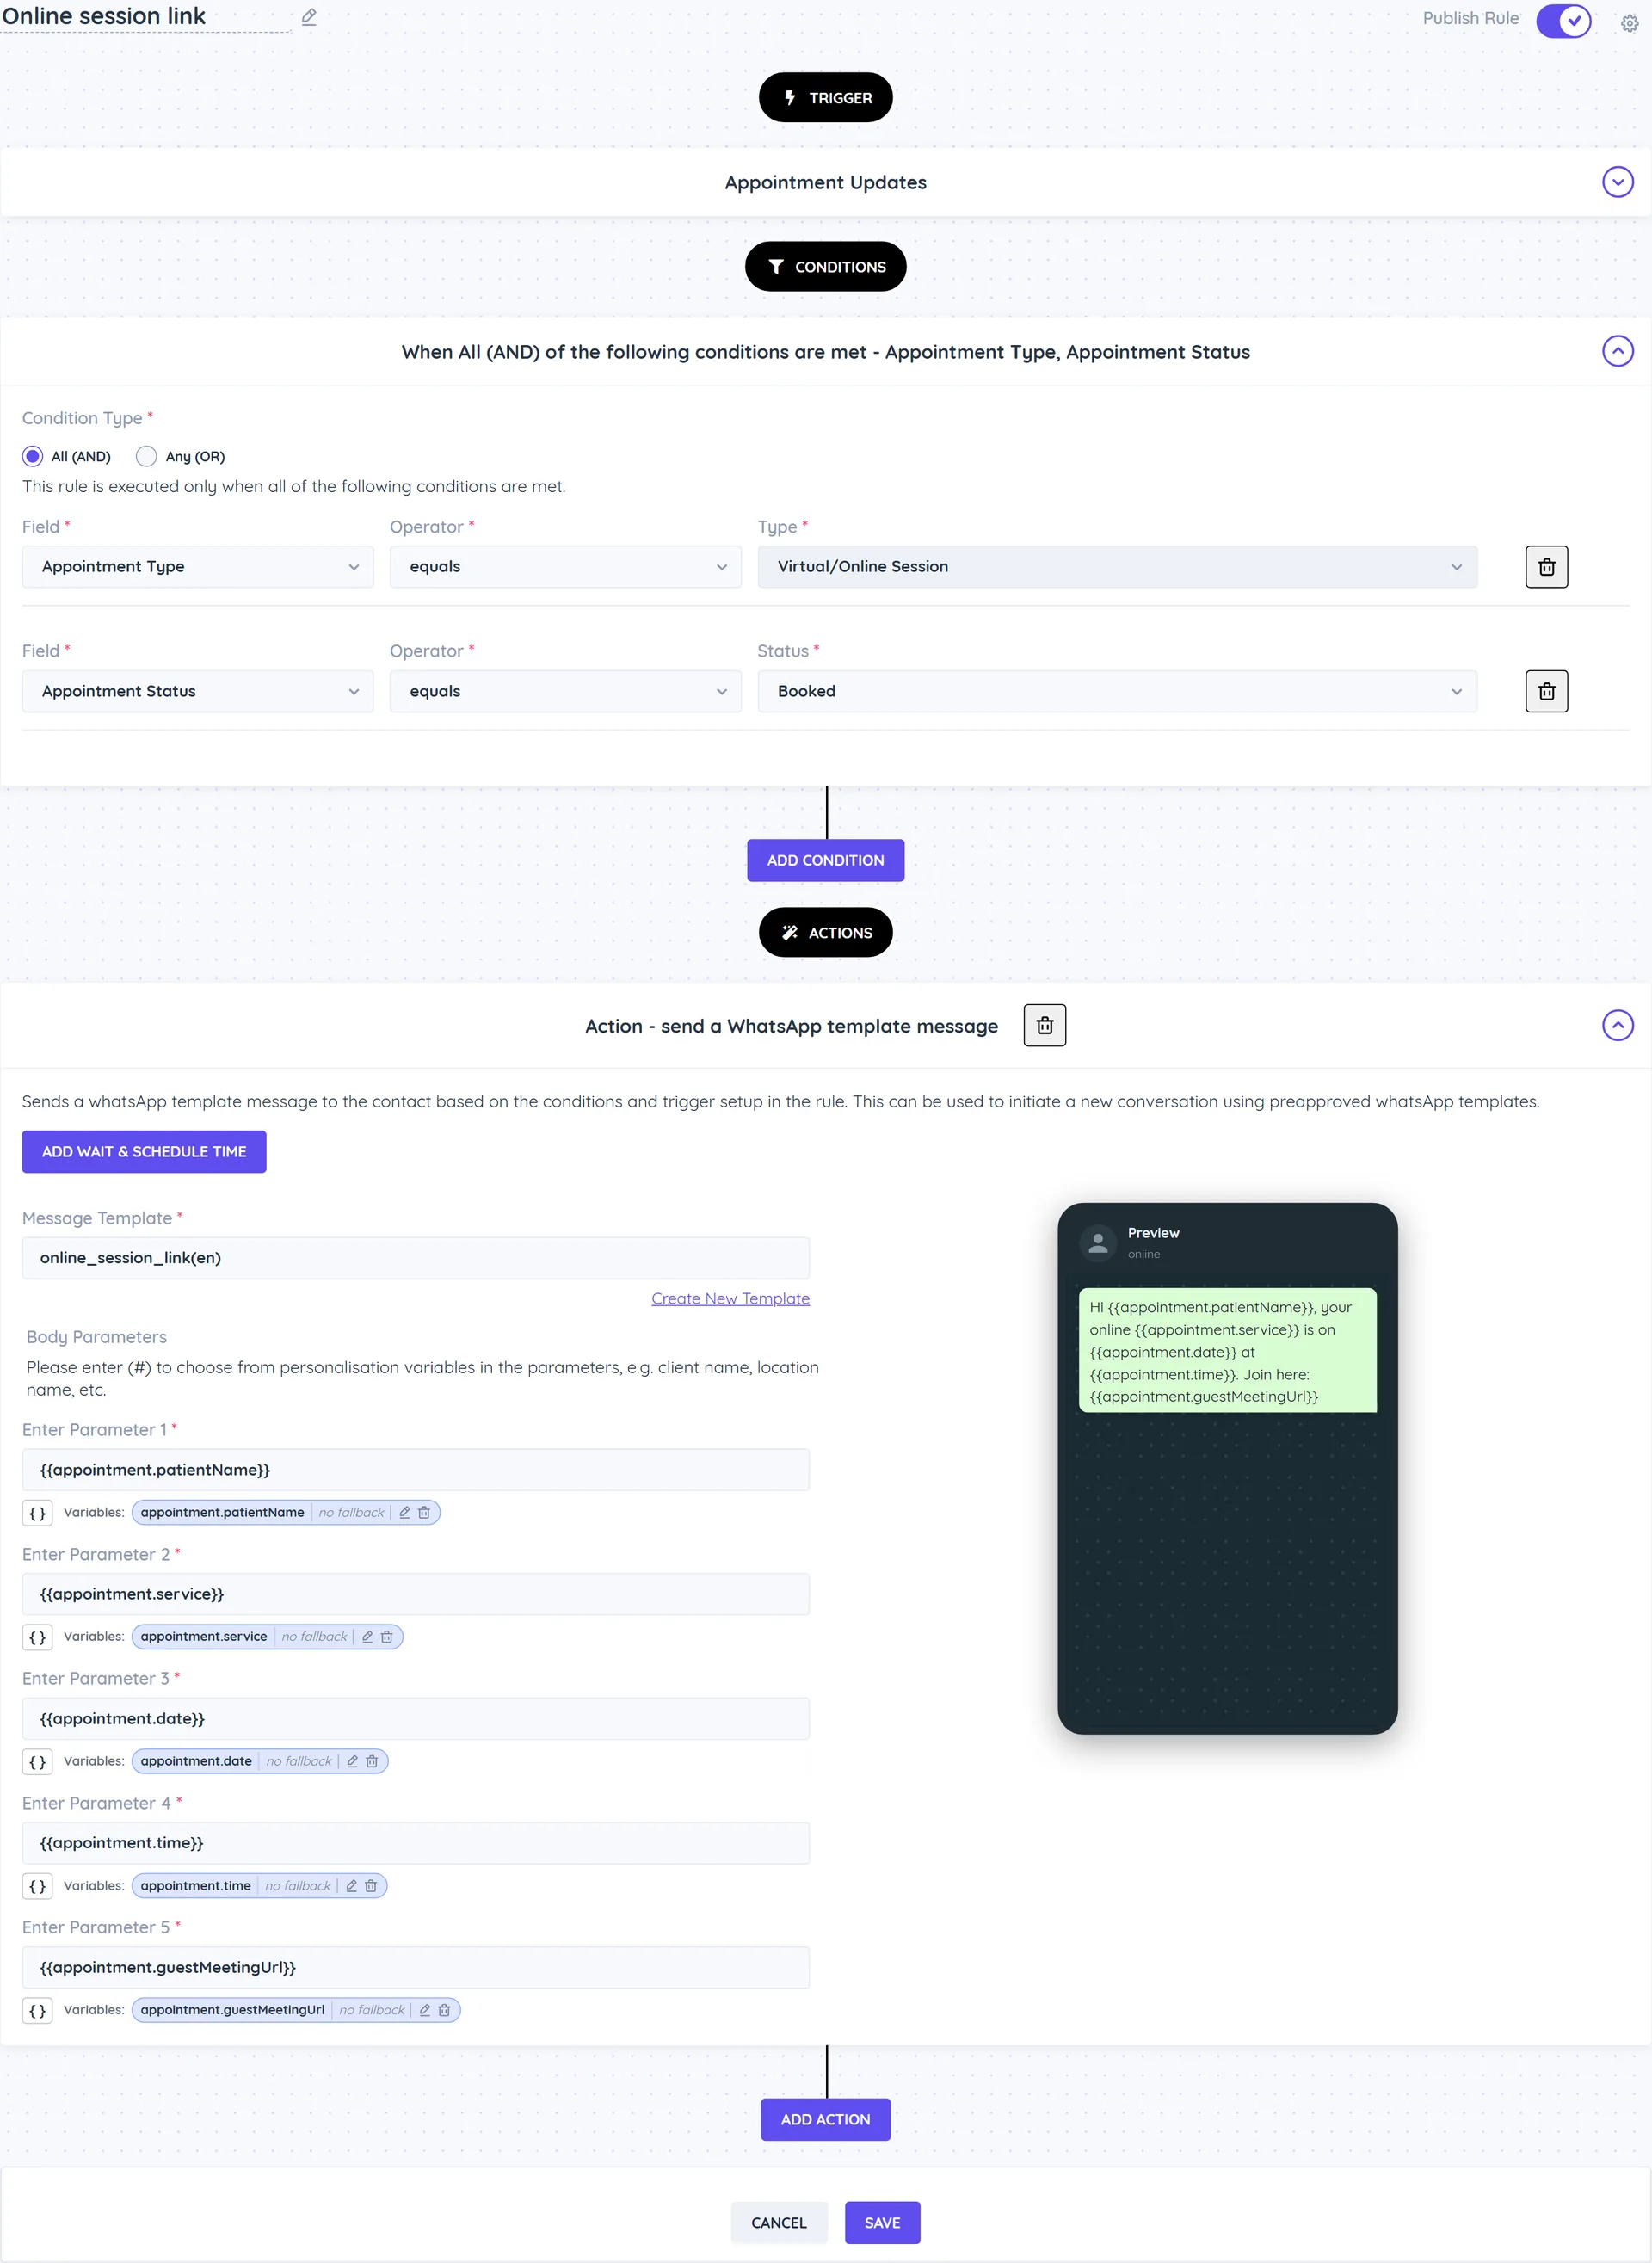
(ii) (a). Select the message template in the **Message Template** field and enter all the Parameters. Eg. I have selected the **teleconsultation\_confirmation(en)** template.

I used the custom message template which was already created and approved by Meta. So first you need to create a new **WhatsApp Message Template**, you can select the **Create New Template** link. This will take us to the template page where we can submit our new template for custom notifications.&#x20;

<mark style="background-color:yellow;">However, please note that any custom notification settings will be discarded, and we will need to set them up again after our new template is approved.</mark>

Check this below link on how to create WhatsApp message templates 👇

[WhatsApp Message Templates](/product-guides/integrations/whatsapp-cloud-api/whatsapp-message-templates.md)

<figure><img src="/files/NDRgrE28LC0r6m03tHCO" alt=""><figcaption></figcaption></figure>

(b). When you enter **(#)** in the Parameter field, a list will pop up. You can choose from the options provided to fill out the parameter details. 👇

**Eg**: #client.name = {{client.name}}, #business.name = {{business.name}}, etc.

**Available Personalisation Variables:**

**Client Variables**

{{client.name}}, {{client.preferredName}}, {{client.age}}, {{client.gender}}, {{client.email}}, {{client.phone}}, {{client.calendarSyncURL}}, {{client.photoURL}}, {{client.address}}, {{client.emergencyRelationType}}, {{client.emergencyContactName}}, {{client.emergencyContactPhone}}

**Business Variables**

{{business.name}}, {{business.address}}, {{business.phone}}, {{business.mapDirectionUrl}}, {{business.operatingHours}}, {{appointment.businessTimezone}}, {{appointment.dateInBusinessTZ}}, {{appointment.timeInBusinessTZ}}, {{appointment.previousDateInBusinessTZ}}, {{appointment.previousTimeInBusinessTZ}}

**Appointment Variables**

{{appointment.practitioner}}, {{appointment.date}}, {{appointment.time}}, {{appointment.previousDate}}, {{appointment.previousTime}}, {{appointment.clientName}}, {{appointment.addToCalendarURL}}, {{appointment.partialAddToCalendarURL}}, {{appointment.location}}, {{appointment.service}}, {{appointment.addons}}, {{appointment.detailsURL}}, {{appointment.partialdetailsURL}}, {{appointment.cancelURL}}, {{appointment.partialcancelURL}}, {{appointment.rescheduleURL}}, {{appointment.partialrescheduleURL}}, {{appointment.practitionerRole}}, {{appointment.price}}, {{appointment.timezone}}

**Virtual/Online Session Variables**

**Guest Meeting URL:** {{appointment.guestMeetingUrl}}

**Meeting Password:** {{appointment.meetingPassword}}

**Host Meeting URL:** {{appointment.hostMeetingUrl}}

<figure><img src="/files/a3N1YTYfpHqKTynTTRZ1" alt=""><figcaption></figcaption></figure>

Step 10: After filling in all the details Click the **Save** button

<figure><img src="/files/lNwDMXtjS5OmfWib8POr" alt=""><figcaption></figcaption></figure>

Step 11: Now book a **Virtual/Online Session** appointment to test the  WhatsApp notification 👇

<figure><img src="/files/q917HuI4gdaPu4pEwNrg" alt=""><figcaption></figcaption></figure>


---

# Agent Instructions: Querying This Documentation

If you need additional information that is not directly available in this page, you can query the documentation dynamically by asking a question.

Perform an HTTP GET request on the current page URL with the `ask` query parameter:

```
GET https://help.whautomate.com/product-guides/appointments/setup-virtual-online-session-notifications.md?ask=<question>
```

The question should be specific, self-contained, and written in natural language.
The response will contain a direct answer to the question and relevant excerpts and sources from the documentation.

Use this mechanism when the answer is not explicitly present in the current page, you need clarification or additional context, or you want to retrieve related documentation sections.