Sell Online with Your Online Store
Your Whautomate online store is a ready-made shop on the same branded page your customers already use to book with you. Customers browse your products, add them to a cart, pick a shipping option, apply a coupon and pay online. Every order lands in Orders with the customer's details, and your WhatsApp automations keep them updated until it is delivered.
If you want to sell online, you do not need a separate e-commerce website, shop plugin or second payment setup. Your products, stock, customers, payments and WhatsApp messages stay in one place.
Who the online store is for
- Shops and product brands that sell physical products and want a simple online shop with delivery or pickup.
- Salons, spas and clinics that sell retail products such as oils, skincare or gift sets next to their bookings.
- Studios, gyms and coaches that sell class packs, memberships and packages online. See Sell Plans and Memberships Online.
- Any business without a website, or with a website that cannot take orders. Share your store link on WhatsApp and social media, or add it to your site with a button.
Already selling on Shopify or WooCommerce? Keep that store and connect it for WhatsApp order updates instead. See Shopify or WooCommerce.
What your customers can do
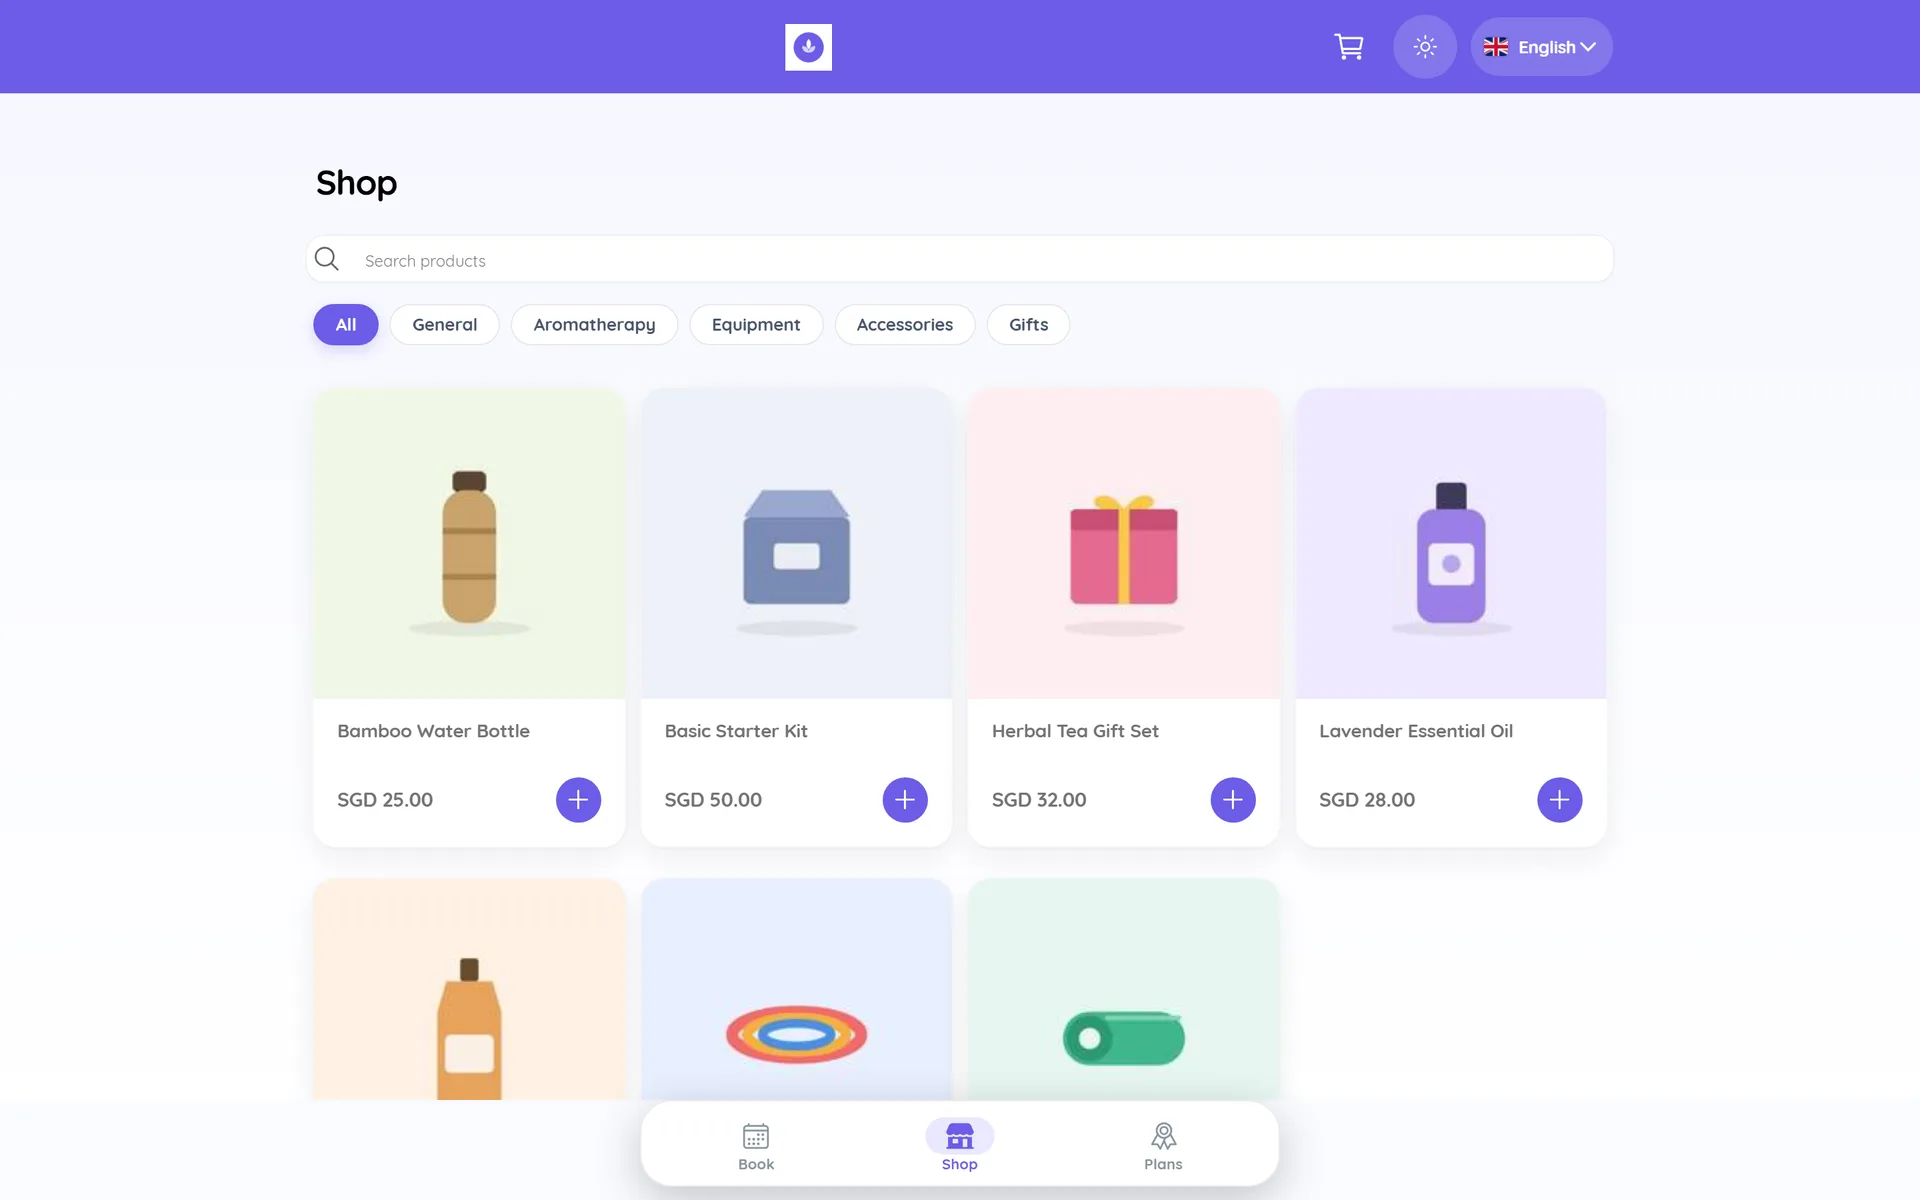
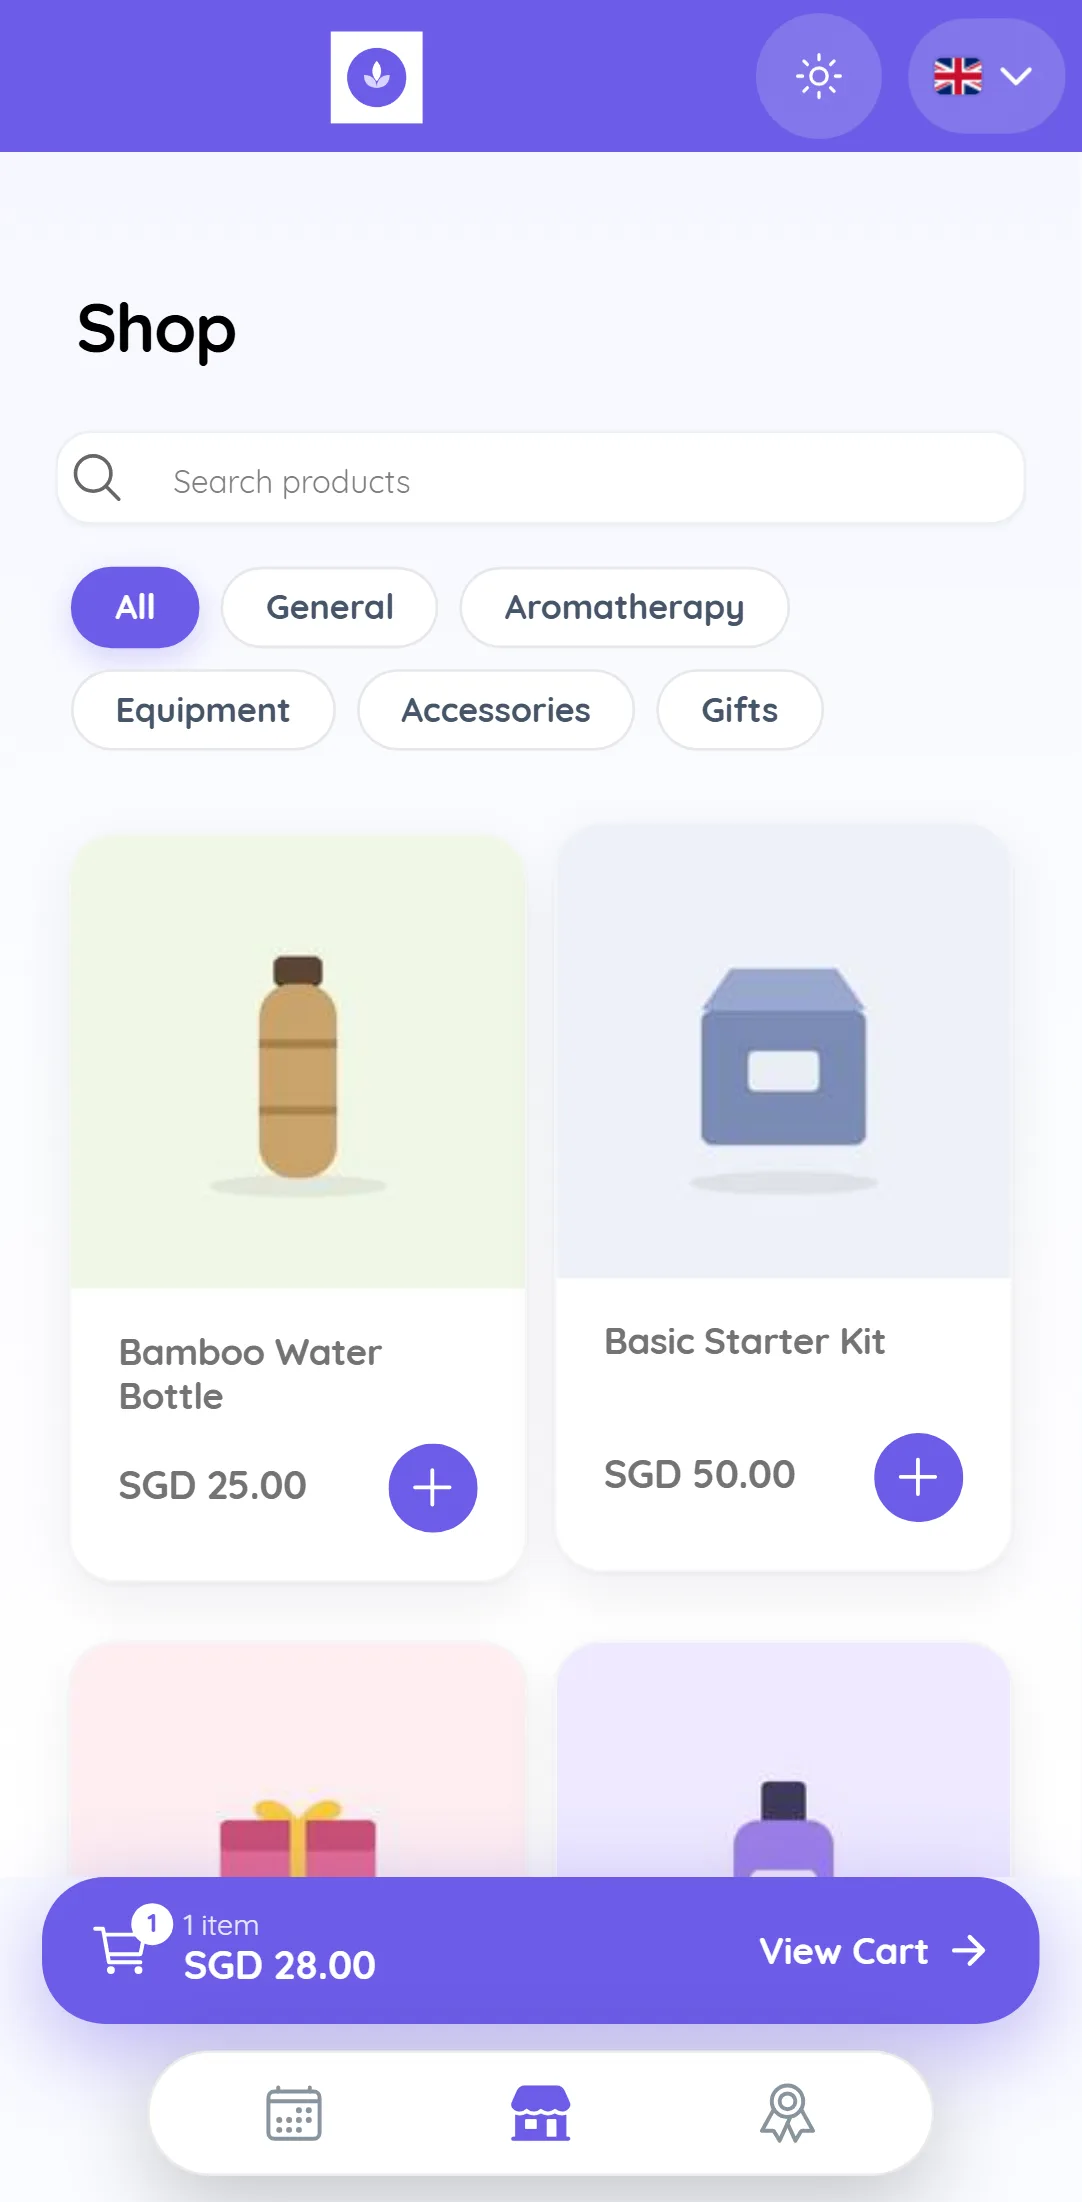
- Browse products in a grid with photos and prices, search by name and filter by category.
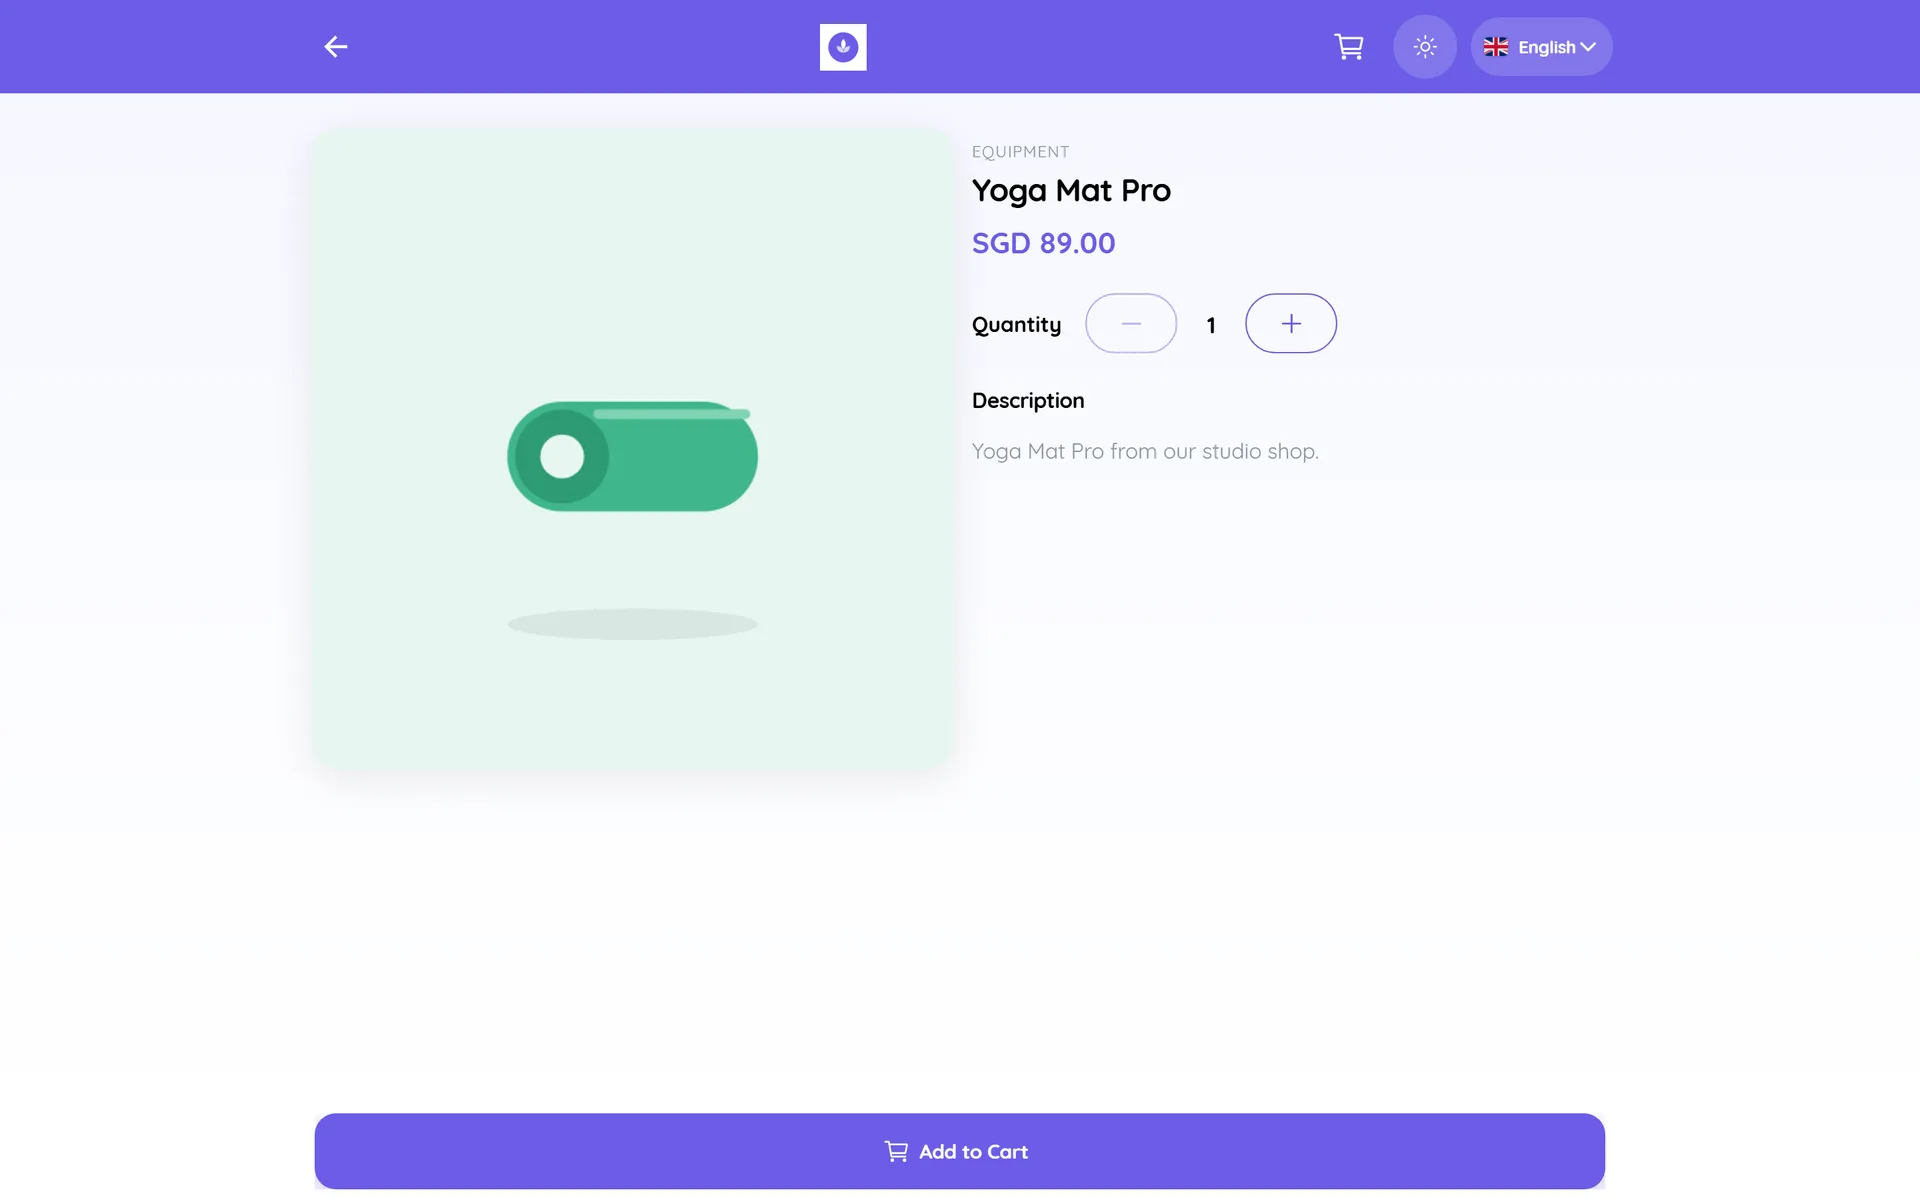
- Open a product to see all its photos, the description and an "Only 3 left in stock" hint when stock is low.
- Add products to a cart that stays on their phone or computer, and change quantities in the cart.
- Check out as a guest or with their account, choose a shipping option or pickup, add order notes and apply a coupon code.
- Pay on a secure payment page with the payment gateway you connected, then see their order confirmation.
- Buy plans, packs and memberships from the Plans tab.
- Book appointments and classes from the Book tab, if you take bookings.
- Log in to see My Orders, order status and tracking links.
The store works in every portal language (English, Arabic, Spanish, Portuguese, French, Chinese and Malay) and has a light and dark theme.
How to sell products online with Whautomate
Set up the store once in this order. Each step links to its full guide.
Before you start
- Your account includes the Sales module. Sales is sold with CRM Suite. See Plan Modules.
- Your booking portal address is set in Settings > Online Booking & Store > Portal Settings. See Setup the Booking Portal. The store and the booking page share this address.
Step 1: Add your products
- Go to Catalogue and open the Inventory tab.
- Click Add New Product, or open an existing product.
- Enter the Product Name, Category and Selling Price. Categories become the filters in your store.
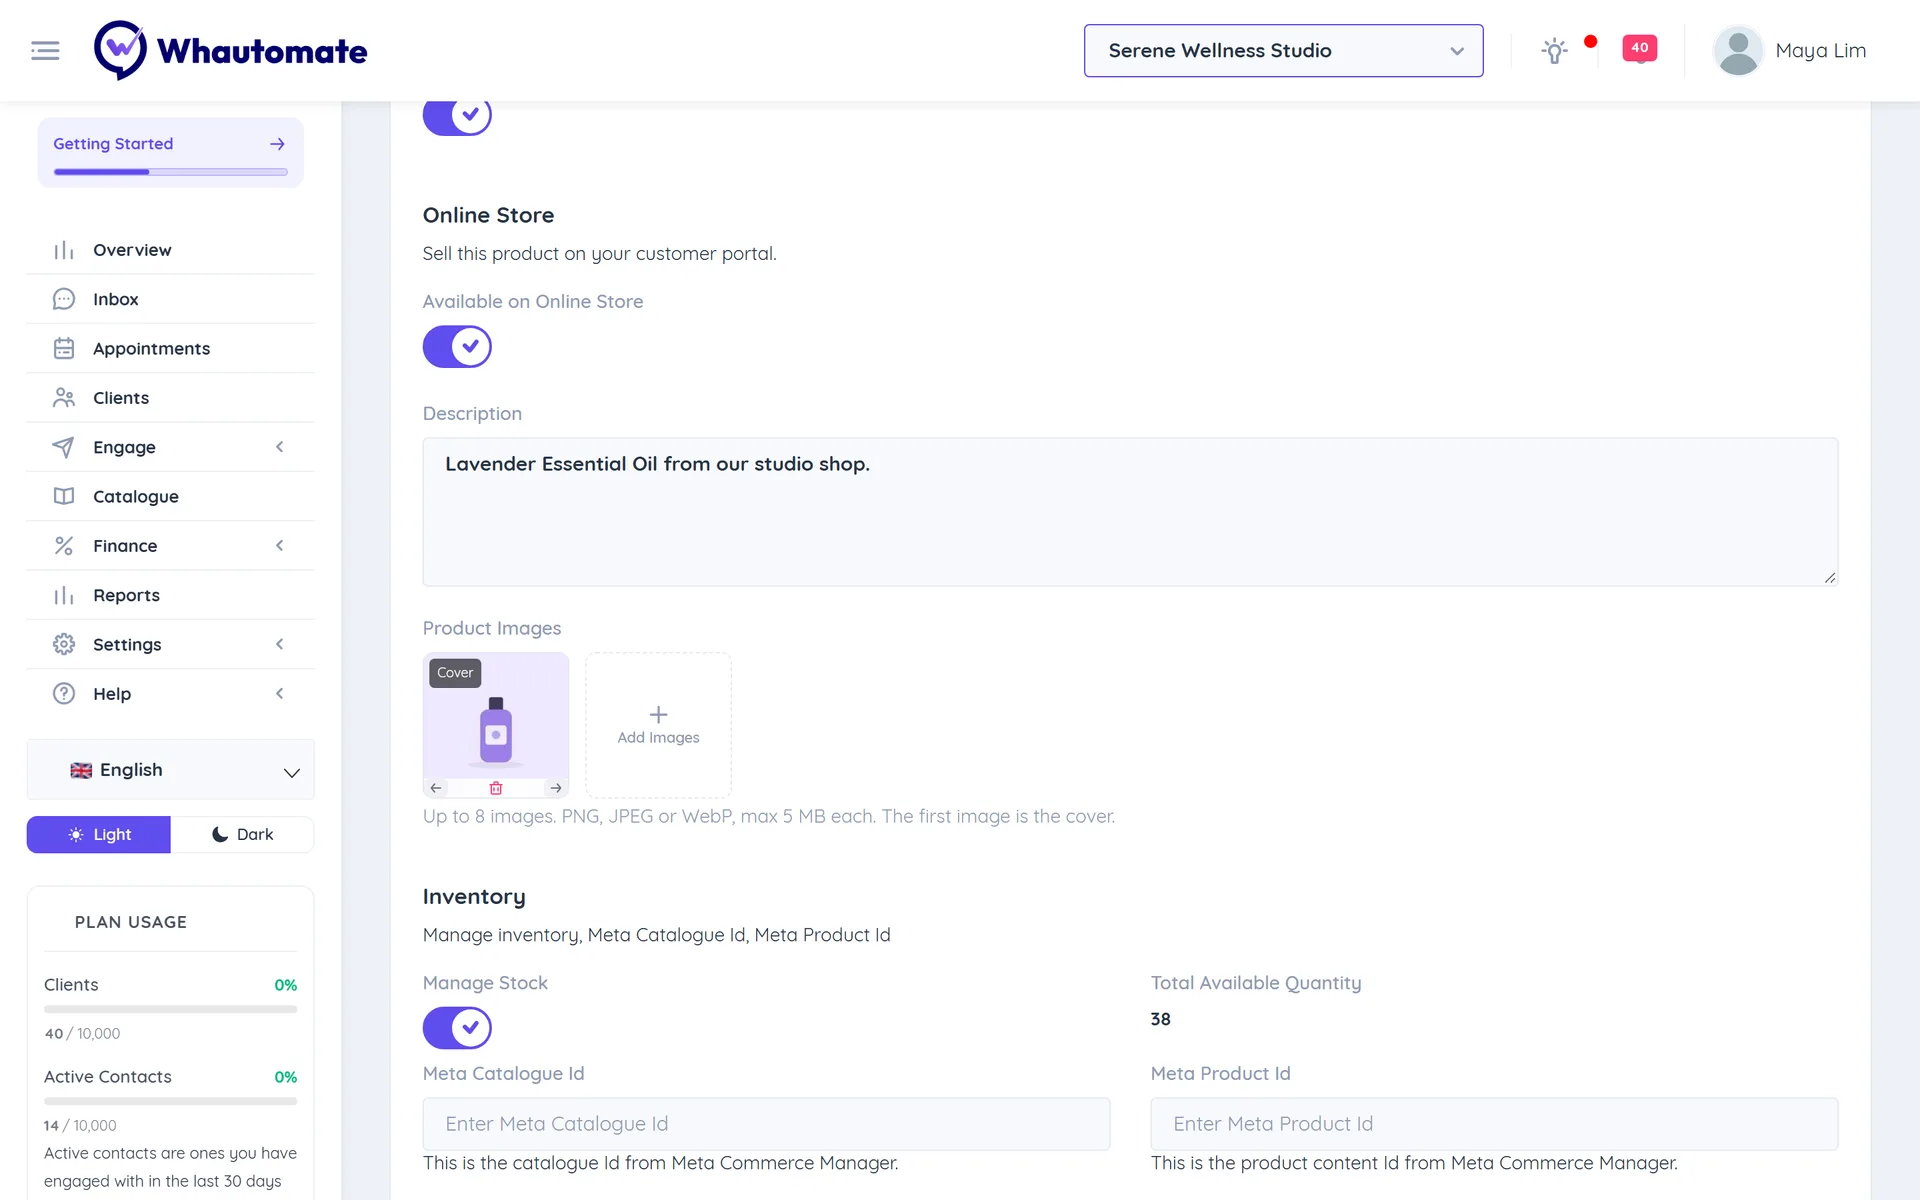
- Under Online Store, turn on Available on Online Store, add a Description and upload Product Images. The first image is the one shown in the product grid.
- Under Inventory, turn on Manage Stock and enter the Current Quantity if you want the store to stop selling when stock runs out.
- Make sure the product is Active, then click Save.
Only active products with Available on Online Store turned on appear in your store. See Products & Inventory.
Step 2: Add plans and memberships (optional)
To sell class packs, memberships or packages, open each plan in Catalogue > Plans & Packages and turn on Available on Online Store under E-Commerce. See Sell Plans and Memberships Online.
Step 3: Connect a payment gateway
Connect Stripe, Razorpay, MyFatoorah, Thawani Pay, PayTabs or DOKU so customers can pay by card or local payment methods. Go to Settings and, under Finance, click Payment Gateways. See Setup Payment Gateway.
Step 4: Set up shipping
- Go to Settings and, under Finance, click Shipping.
- Turn on Enable Shipping?.
- Add shipping options, for example "Standard delivery" with a Flat Fee, or a Price Based option that is free above a set order value.
Customers then choose an option and enter a delivery address at checkout. If shipping is off, or no option is set up, checkout skips the address and tells the customer: "This order will be prepared for pickup or arranged directly with you after checkout." See Shipping.
Step 5: Set up taxes
Go to Settings and, under Finance, click Taxes. A product uses the taxes picked in its Tax Override; if it has none, it uses your taxes set to Apply to All Products. Prices in the store are shown before tax, and tax is added as a Taxes line in the cart and at checkout. See Taxes.
Step 6: Create coupons (optional)
Go to Settings and, under Finance, click Coupons to create codes such as WELCOME10. Customers enter the code at checkout. See Coupons.
Step 7: Turn on the store
- Go to Settings > All Settings.
- Under Website & Booking Portal, click Online Booking & Store.
- Open the Online Store tab.
- Turn on Sell Products Online. Turn on Sell Plans Online too if you sell plans.
- If you have more than one location, choose the Storefront Mode (see below).
- Click Save.
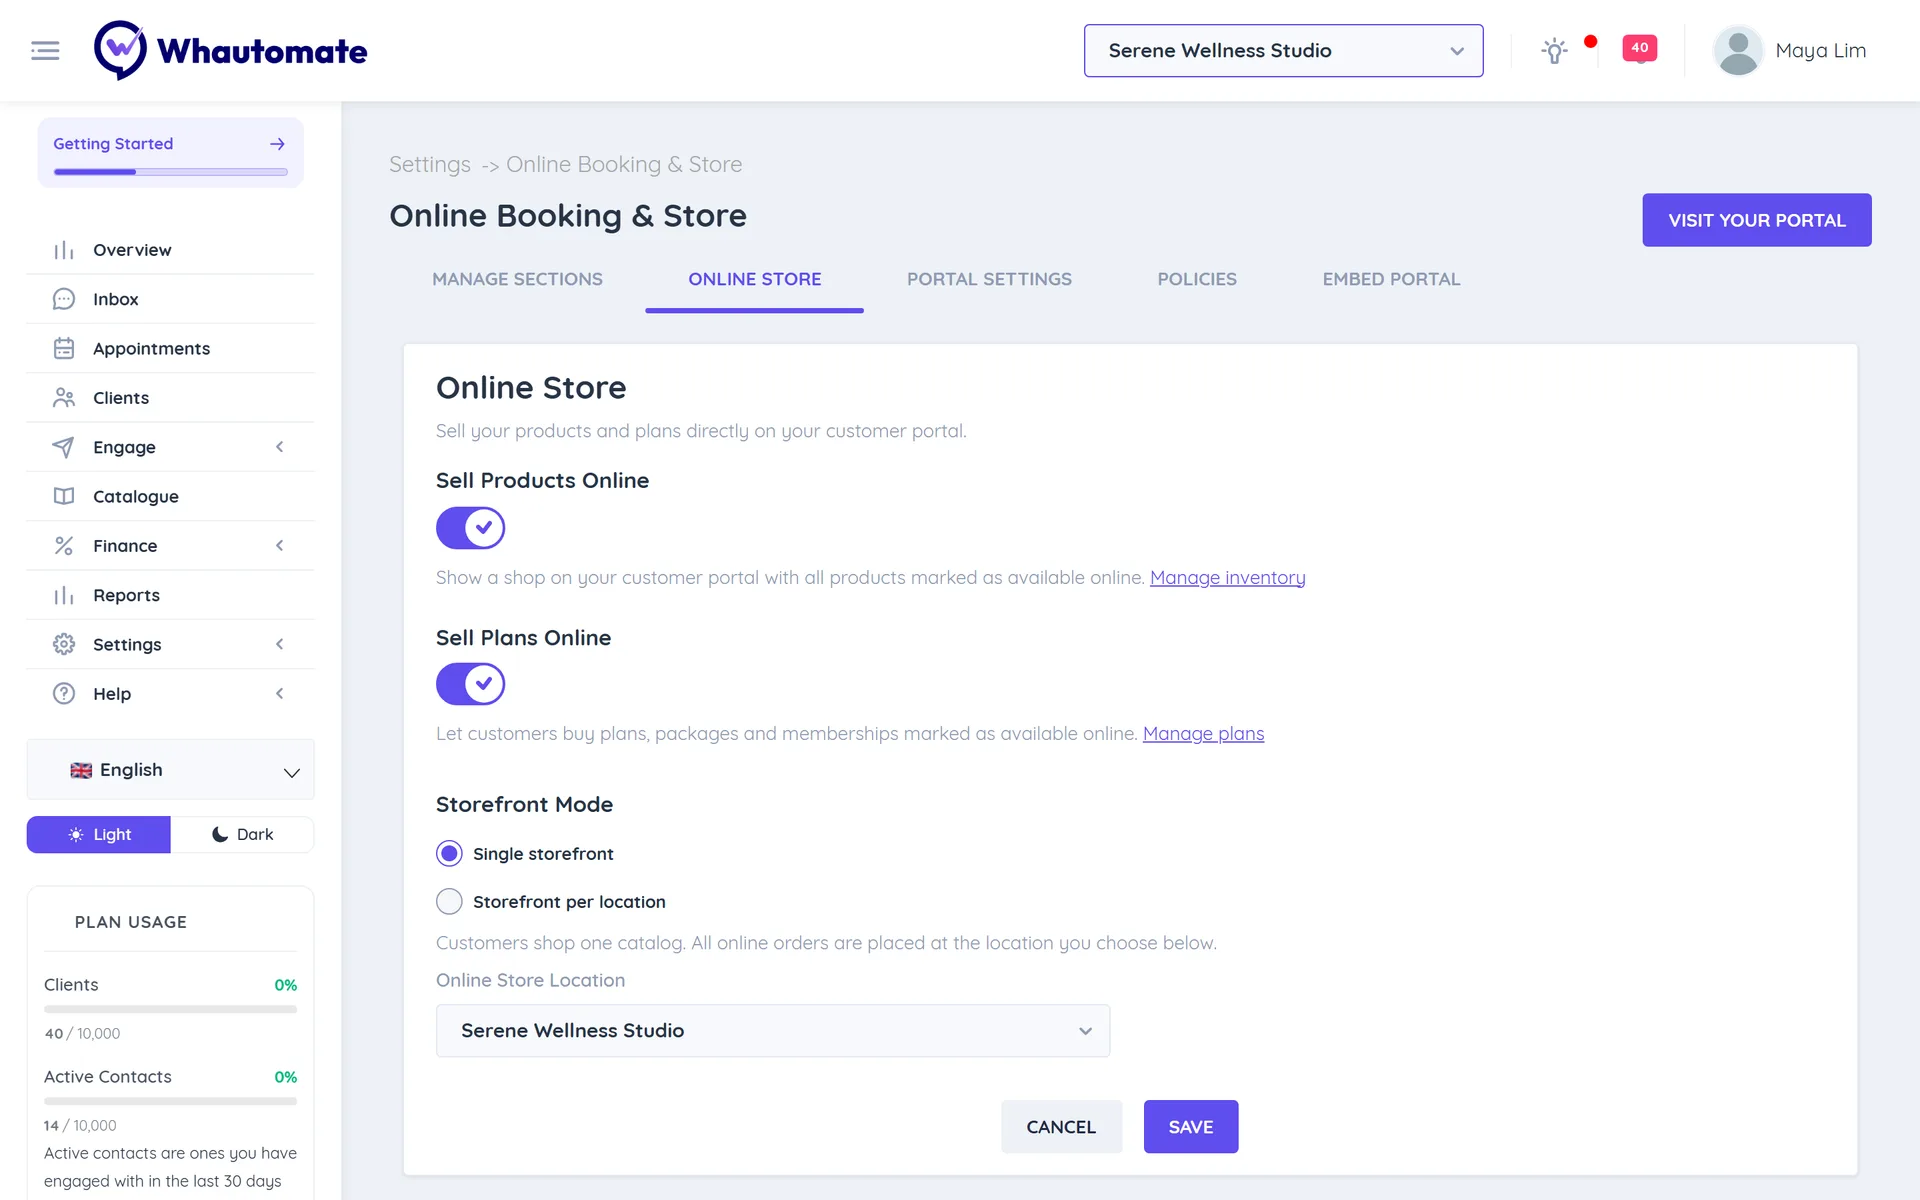
The Related Settings card on the same tab links to Shipping Options.
If you only sell and do not take bookings, go to the Manage Sections tab and turn off Enable Online Bookings. Your portal then opens straight on the shop.
Step 8: Choose a storefront mode (several locations)
Storefront Mode appears when your account has more than one location.
| Mode | How it works | Use it when |
|---|---|---|
| Single storefront | Customers shop one catalog. All online orders are placed at the location you choose in Online Store Location. | You ship from one warehouse or shop. |
| Storefront per location | Each location has its own storefront. Customers pick a location once and it is remembered; they can switch with Change next to the location name. | Each branch sells and fulfils its own orders. |
Products, plans, shipping options, taxes and coupons belong to a location, so the store shows what is set up at the storefront's location. A cart holds products from one location only: if a customer adds a product from another location, they are asked "Start a new cart?".
Step 9: Brand your store
On the Manage Sections tab of Online Booking & Store:
- In Branding, set your Primary color, logo and favicon. The store, booking pages and secure payment page use your colour.
- In Page Settings, fill in the SEO Metadata Title, Description and Social share image. These show in Google results and when you share your store link on WhatsApp or social media.
- Optional: add your Google Tag Manager container ID to track store visits.
- Click Save.
Add your Terms & Conditions (incl. Refunds & Cancellation) and Privacy Policy on the Policies tab; customers see the links at checkout. See Setup the Booking Portal.
Step 10: Decide whether customers must log in
On the Manage Sections tab, Require Sign Up / Login decides how customers check out:
- Off: customers check out as guests with their name and mobile number plus the booking fields you turned on. A new customer is added to your clients automatically.
- On: customers sign up or log in first and verify with a 6-digit code. At checkout they choose which profile they are ordering for and can reuse saved addresses. They can see all their orders in My Orders.
See Client Portal.
Step 11: Test your store
Click Visit Your Portal at the top of Online Booking & Store and place a test order. Then find it in Finance > Orders.
Share your online store
Your store lives at your portal address. Share it anywhere your customers are:
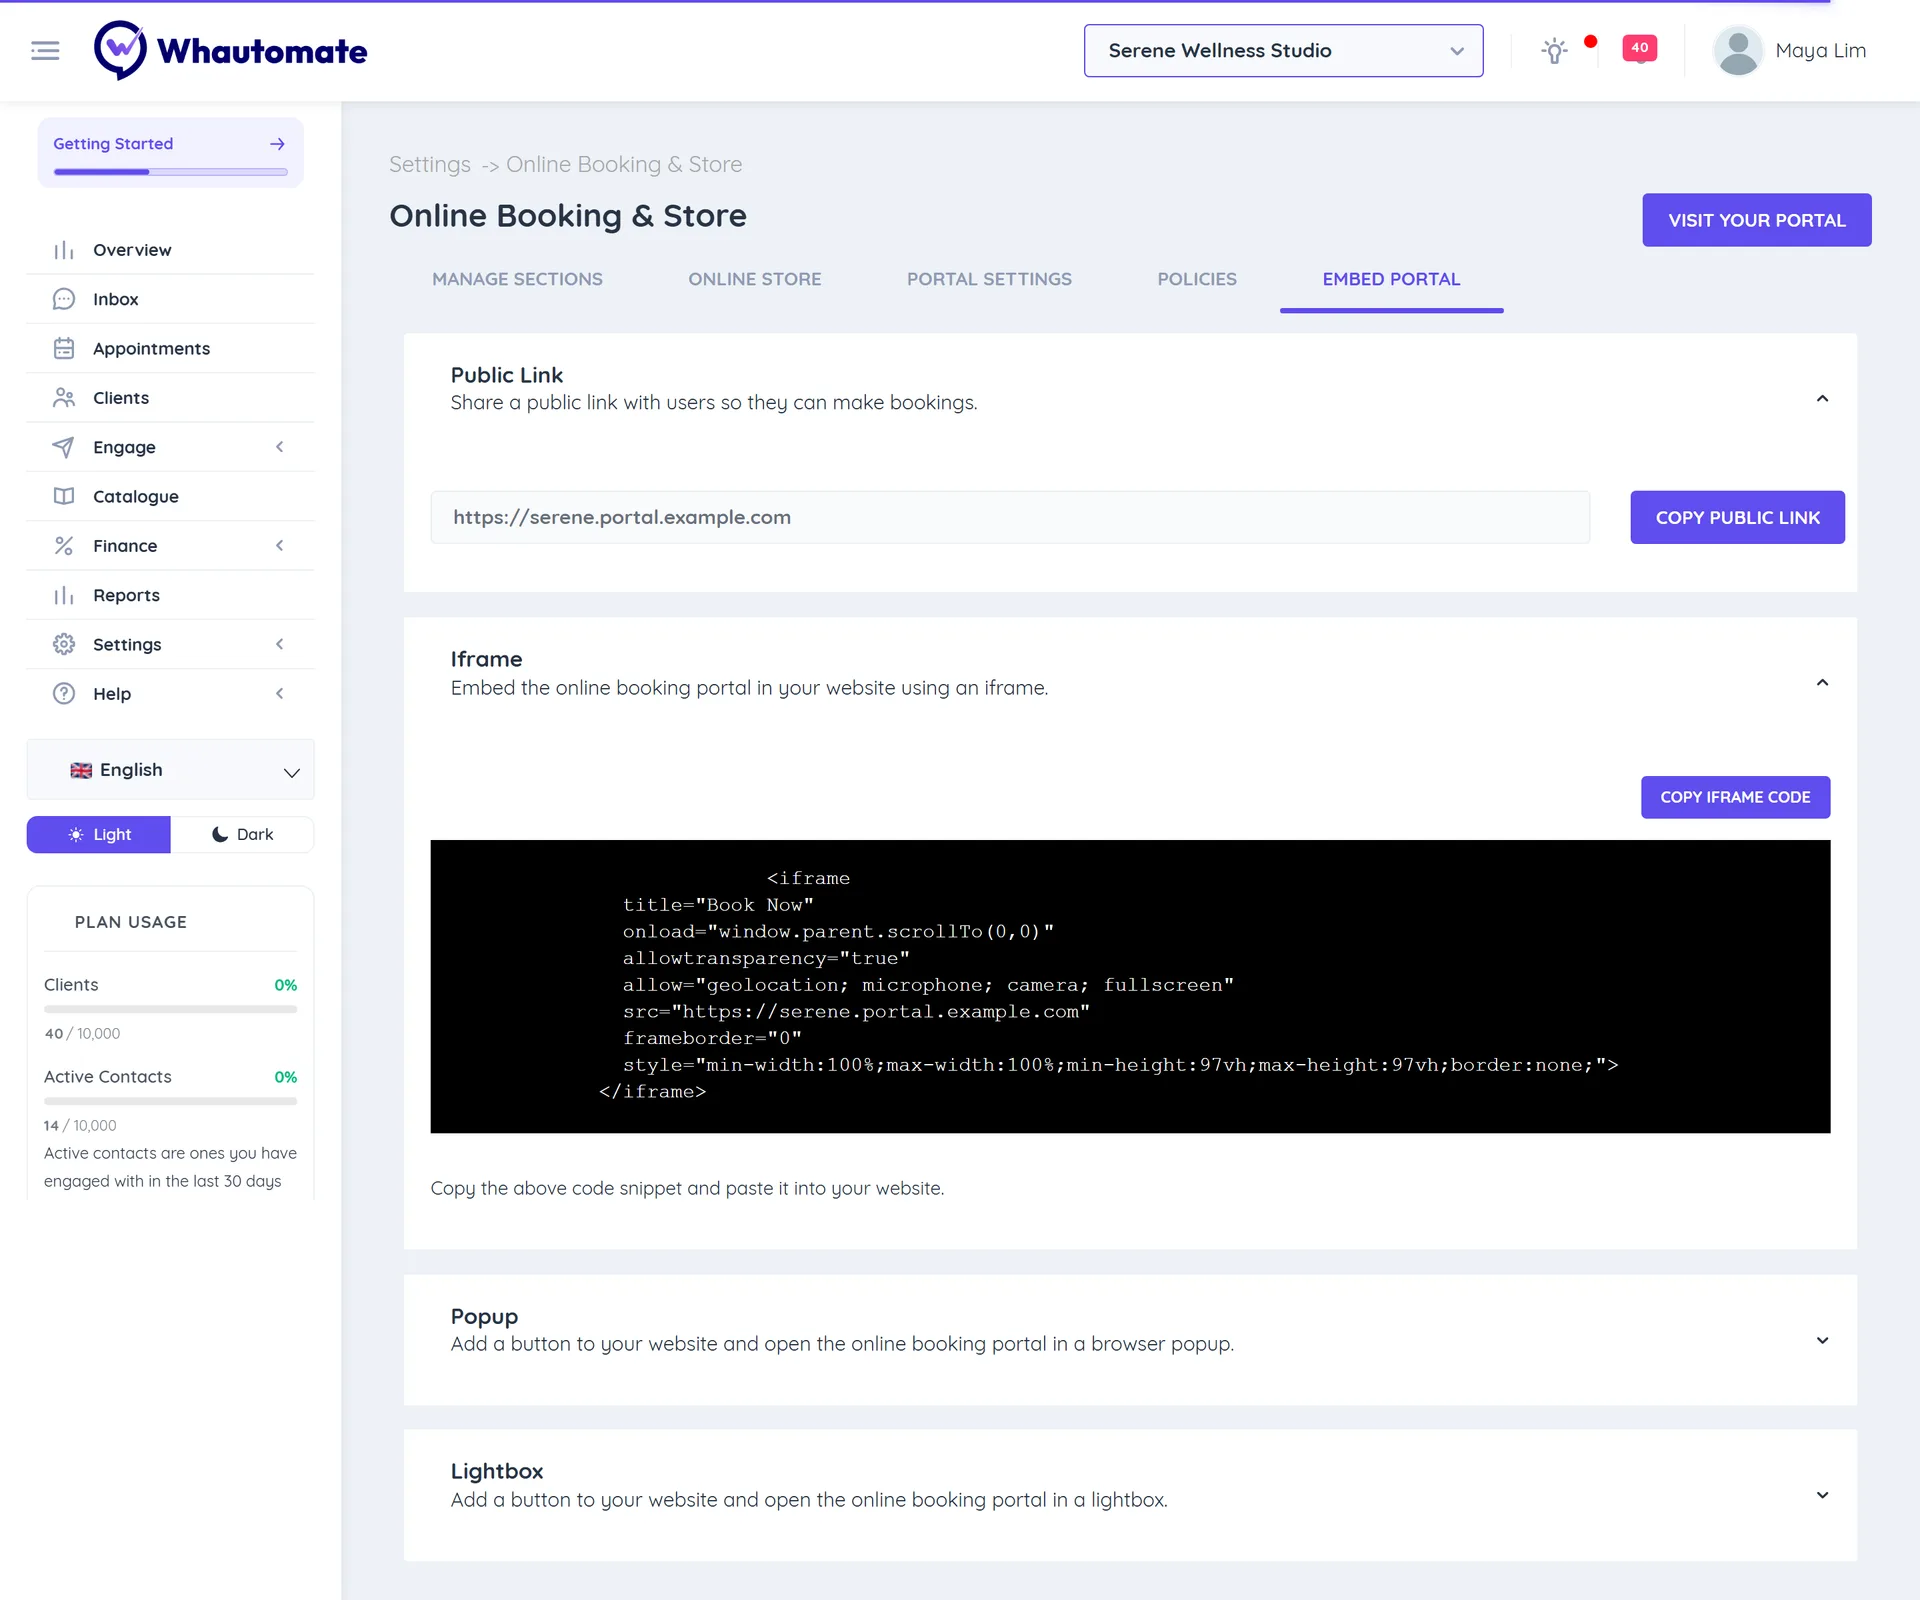
- Store link: on the Embed Portal tab, copy the Public Link. When bookings are turned off, this link opens the shop directly. When bookings are on, customers switch to the shop with the Shop tab, or you can share the shop page itself: open your store and copy the address from the browser (it ends in
/1/shop). - Per-location links: in Storefront per location mode, each location has its own store address. Open the location's shop and copy the address from the browser; it ends in
/1/shop/followed by the location's ID. Customers who open it go straight to that location's products. - Your website: on the Embed Portal tab, copy the Iframe code to show the store inside a page, or the Popup or Lightbox code for a "Shop now" style button. Paste the code into your website builder. No website yet? Build one with Sites and link it to your store.
- WhatsApp: send the link in chats and broadcasts, add it to quick replies, and put it in your WhatsApp business profile.
- Social media: add it to your Instagram, TikTok or Facebook bio, or link-in-bio page. The SEO title, description and share image make the link preview look right.
- In store: turn the link into a QR code for your counter, flyers or packaging.
The customer journey, step by step
- Browse the shop. The customer opens your store and sees your products. They can search, filter by category and tap the + button on a product to add one straight to the cart. Out-of-stock products show Out of stock.
- View a product. The product page shows the photos, price, Quantity and Description. They tap Add to Cart.
- Open the cart. A cart bar at the bottom of the screen shows the number of items, the subtotal and View Cart. On a computer there is also a cart icon in the header.
- Review the cart. Your Cart lists each product with a quantity stepper, and the Order Summary shows Subtotal, Taxes and Total. If shipping is on, it says "Shipping is calculated at checkout". They tap Checkout.
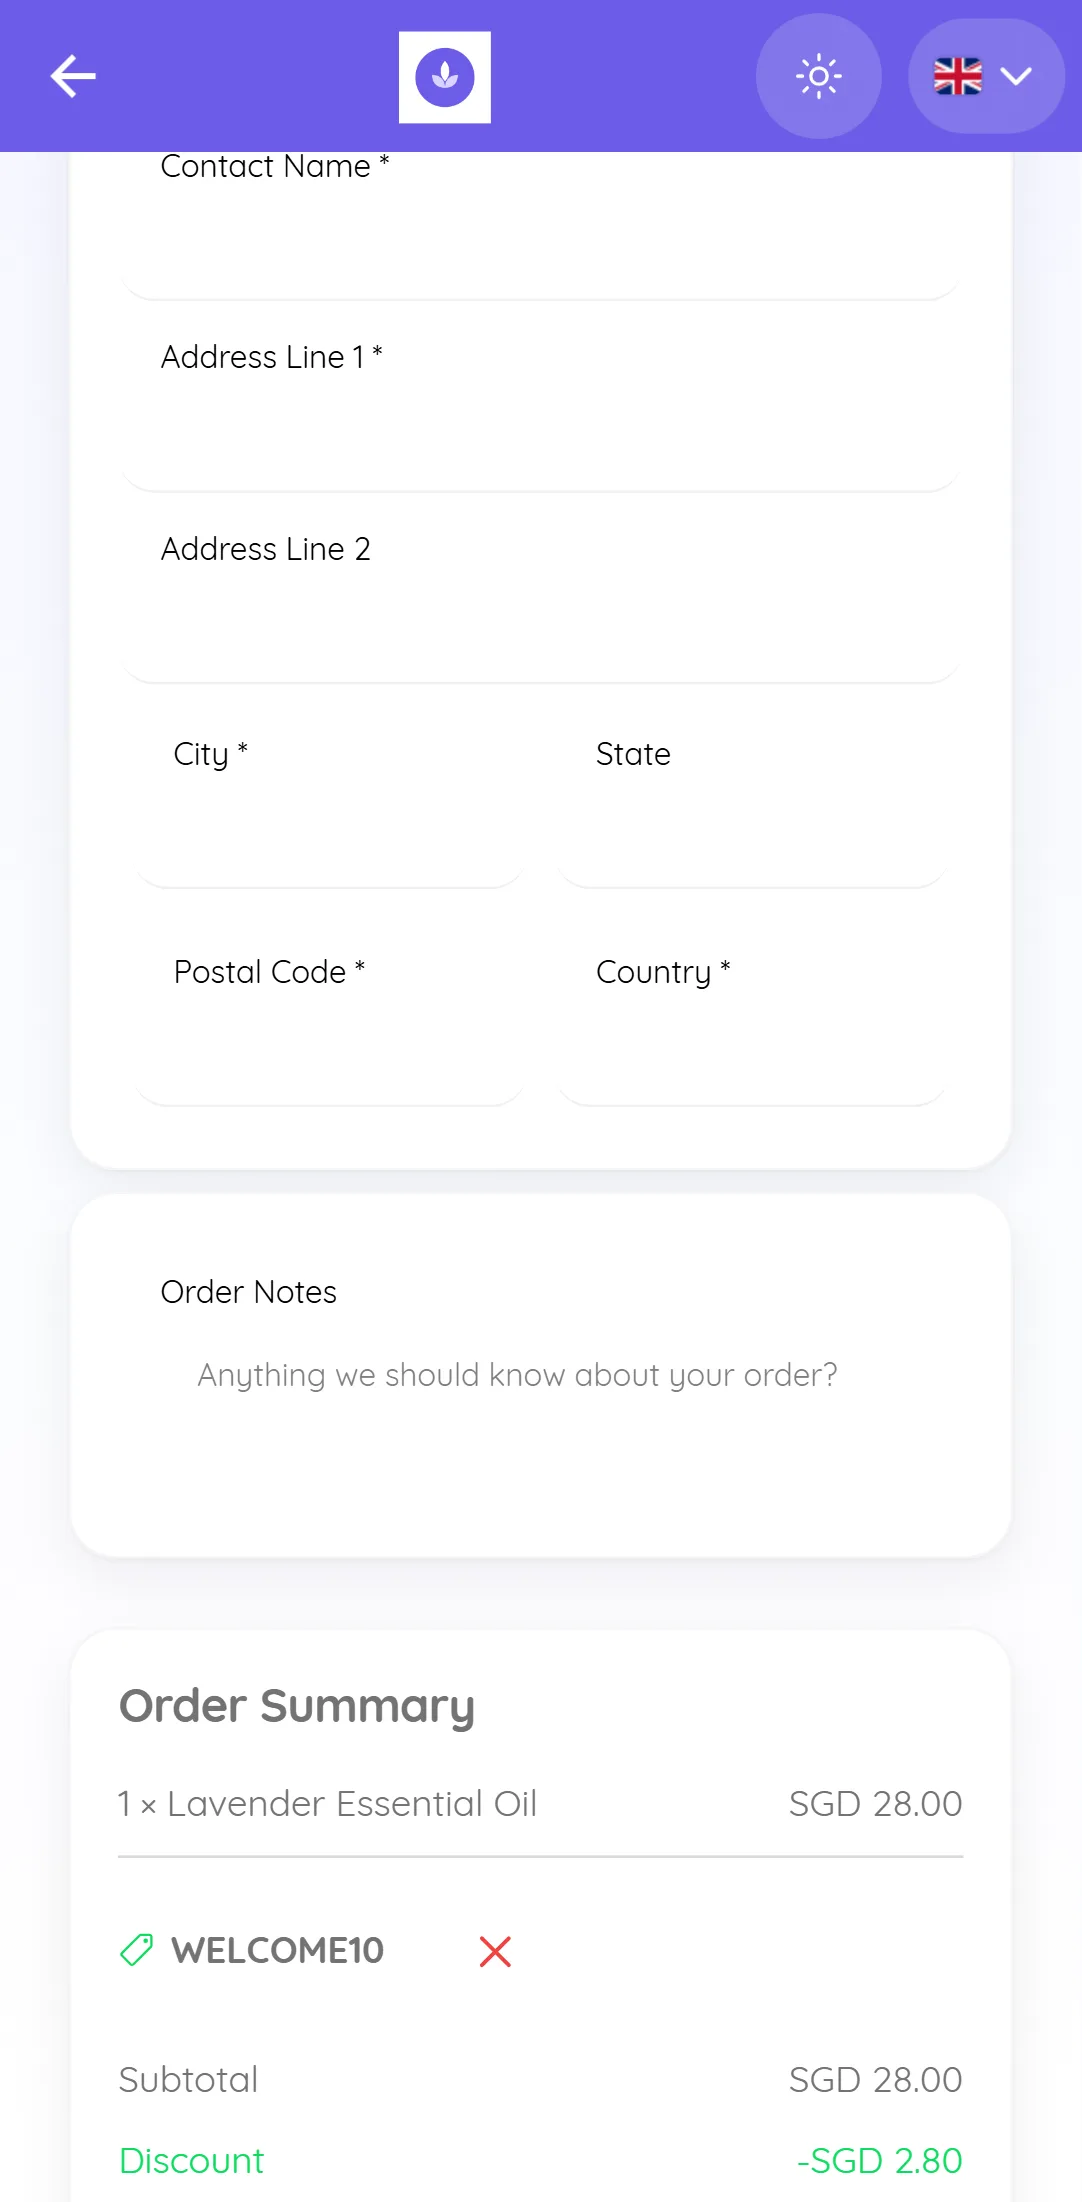
- Check out. On Checkout the customer:
- enters their Contact Details, or logs in and chooses the profile they are Ordering for;
- picks a Shipping option (fees show next to each one, or Free) and enters or picks a Shipping Address;
- adds Order Notes if needed;
- enters a Coupon code and taps Apply. A valid coupon adds a Discount line.
- Place the order. They tap Place Order. A quick, invisible check confirms they are human, then they are sent to your secure payment page ("You will be redirected to a secure page to complete the payment.").
- Pay. On the secure payment page they choose a payment method and pay with your gateway.
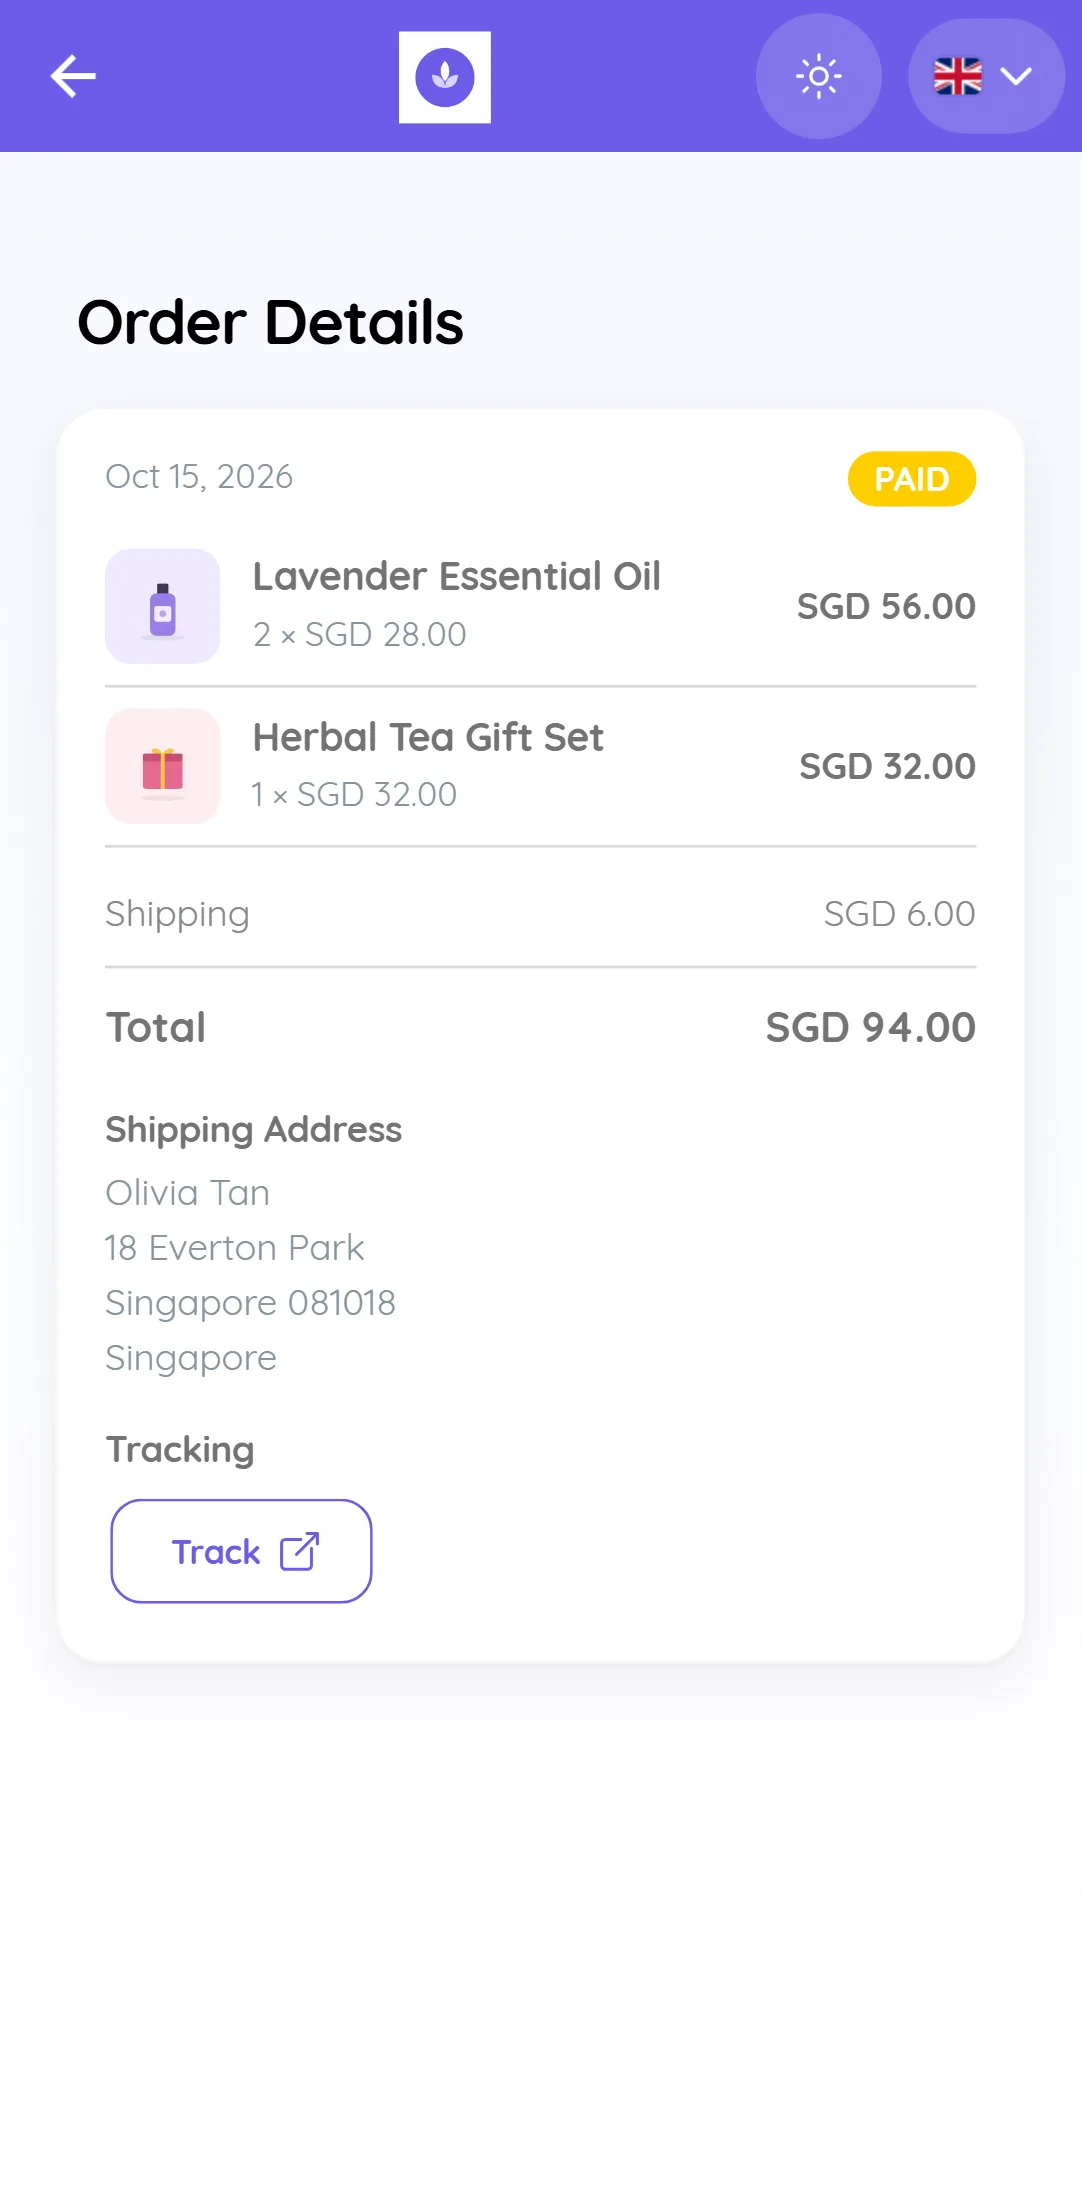
- See the confirmation. They come back to your store and see Confirming your order. Once the payment is confirmed, the order opens in Order Details with the Paid status, the items, shipping, total and shipping address. If they cancel payment, they see Payment was cancelled and can try again from their cart.
If a coupon brings the total to zero, the order is confirmed straight away without a payment step.
Book, Shop and Plans tabs
When your portal offers more than one of bookings, products and plans, customers move between them with the Book, Shop and Plans tabs at the bottom of the page. On phones the tabs show icons only. If you offer only one, the tab bar is hidden and the portal opens on that one.
My Orders
Customers who log in can open My Orders from the account menu. It lists each order with its number, date, item count, total and status. Opening an order shows Order Details with the items, discount, shipping, total, Shipping Address and a Track button when you add a tracking link. Each profile in the client portal also shows its orders.
Manage online orders
Every store order appears in Finance > Orders with Order From set to Online Store, next to orders from WhatsApp and your team. Each order has an invoice, so payments, receipts and reports work as they do for any other sale.
- The order starts as Pending and moves to Paid when the payment comes in.
- Update it to Processing, Shipping and Delivered as you fulfil it, and add the tracking number, tracking URL and carrier with Update Shipping Info.
- Stock goes down as soon as the order is placed, so two customers cannot buy the last item. To put stock back for an order that is never paid, void its invoice.
See Orders.
Automate order updates on WhatsApp
Turn on an Order Updates automation so customers get a WhatsApp, email or SMS message each time their order status changes, with the tracking link when it ships. Install the ready-made Automate Order Updates template in Engage > Automations. See Automate Order Updates and the Order Updates trigger.
After delivery, ask for a review automatically. See Automate Order Reviews & Surveys.
The online store is a web shop customers open from a link. The WhatsApp e-commerce chatbot is a separate channel that lets customers browse and buy inside a WhatsApp chat using your WhatsApp catalog. Both use the same products, stock, payment gateway, shipping and Orders page, so you can run them side by side.
Tips and limits
- Products per location. Products, plans, shipping, taxes and coupons are set up per location. In Single storefront mode, set them up at your Online Store Location.
- Stock. With Manage Stock on, customers cannot order more than you have. Without it, a product never shows as out of stock.
- Cart. The cart is saved on the customer's device and holds up to 50 different products from one location.
- Coupons. One coupon per order. It applies to the product subtotal before tax and shipping, and its limits (expiry, total uses, uses per customer) are checked at checkout.
- Shipping fees. Price Based shipping is worked out on the product subtotal before the coupon discount.
- Images. Use square, well-lit photos of the same size so the product grid looks even.
- Plan modules. If Sales is not on your plan, the Online Store tab shows a lock, and customers who open a store link are taken to your portal home. They never see plan or upgrade wording, and links to existing orders keep working.
FAQ
Do I need a website to sell online with Whautomate?
No. Your online store has its own link that you can share on WhatsApp, social media and QR codes. If you have a website, you can embed the store in it.
Can customers buy without creating an account?
Yes, unless you turn on Require Sign Up / Login. Guests enter their name and mobile number at checkout and are added to your clients.
Which payment methods can customers use?
The ones your connected payment gateway supports, such as cards, wallets or local bank payments. See Setup Payment Gateway.
Can I offer pickup instead of delivery?
Yes. Leave shipping off, or turn it on and add a free "Pickup" option. Without shipping, checkout skips the address.
Can I sell memberships and class packs in the same store?
Yes. Turn on Sell Plans Online and mark your plans Available on Online Store. They appear on the Plans tab. See Sell Plans and Memberships Online.
Where do I see online orders?
In Finance > Orders, with Order From showing Online Store.